VR LBE (Location-Based Entertainment) Large Space Instructions
Prerequisites
1. Supported Devices
- YVR 2
- PFDM MR
2. Supported Versions
Enterprise version + LBE APP
3. Space Environment
Lighting Requirements
Ensure the entire environment has good lighting conditions.
It is recommended to use multiple light sources to avoid shadows and reflections caused by a single light source.
Distribute the light sources evenly throughout the space to avoid overly dark or bright areas, ensuring the device's sensors can stably track the space.
Use neutral color temperature light sources (4000K-5000K) to provide better sensing conditions for the device without affecting the ambiance.
It is recommended to install adjustable brightness lighting equipment to fine-tune the lighting according to specific testing or demonstration needs, meeting the tracking accuracy requirements for different scenarios.
Interior Decoration
To ensure the device's spatial tracking performance, it is recommended to use the "Play For Dream - LBE Environment Texture" as the main style for interior decoration. This texture design provides rich visual features, enhancing the stability and accuracy of the device's tracking.
When selecting materials for walls, floors, and ceilings, avoid using overly smooth or reflective materials to prevent light reflection from affecting the device's tracking performance. Matte or slightly textured materials are recommended to provide better environmental visual features

Map Creation Process
1. Open the LBE Application
Open the [LBE] application and select [Create Map] on the main page to start the LBE map creation process;
.png)
2. Ground Height Recognition
After starting the map creation, you first need to determine the ground height for the LBE;
The system will automatically recognize the ground height. If the automatic ground height recognition is inaccurate, you can press the controller trigger to reset the ground height to the current position of the controller by pressing the blue prompt surface with the controller to align it with the actual ground height;
.png)
Confirm that the blue prompt surface is aligned with the ground, then click next to continue.
3. Define the LBE Boundary
In this step, you need to pre-mark the LBE area for user activities; the system will create an environmental map for this area to ensure the tracking accuracy and stability of the VR device in this area; when the user exceeds this area, a corresponding safety prompt will be displayed;
Click [Start Scanning] to enter the boundary drawing process;
.png)
You can use the controller ray to point to the ground and press the [controller trigger] to mark boundary points. When the boundary points are connected end to end, the system will create the LBE boundary for you;
During the drawing process, you can undo the last drawn point at any time by pressing the [controller B button] and re-mark it;
After completing the drawing, you can move the marked points by pressing the [controller grip button];
You can look at the controller to see the corresponding operation prompts.
.png)
After completing the drawing, click [Next] to proceed to the next step;
.png)
4. Space Scanning
The system will automatically generate multiple 3m x 3m space areas based on the LBE boundary you drew; you need to stand in each area and scan the entire area according to the prompts; click [Start Scanning] on the page to enter the scanning process;
.png)
After entering the scan, please stand in any space area and look around each grid in the area; when you look at the grid, it will change from yellow to blue;
Please pay attention to the footprints on the ground in the area. During the grid scanning process, move within the area along the footprints on the ground; when you stand on the footprints, they will change from white to blue;
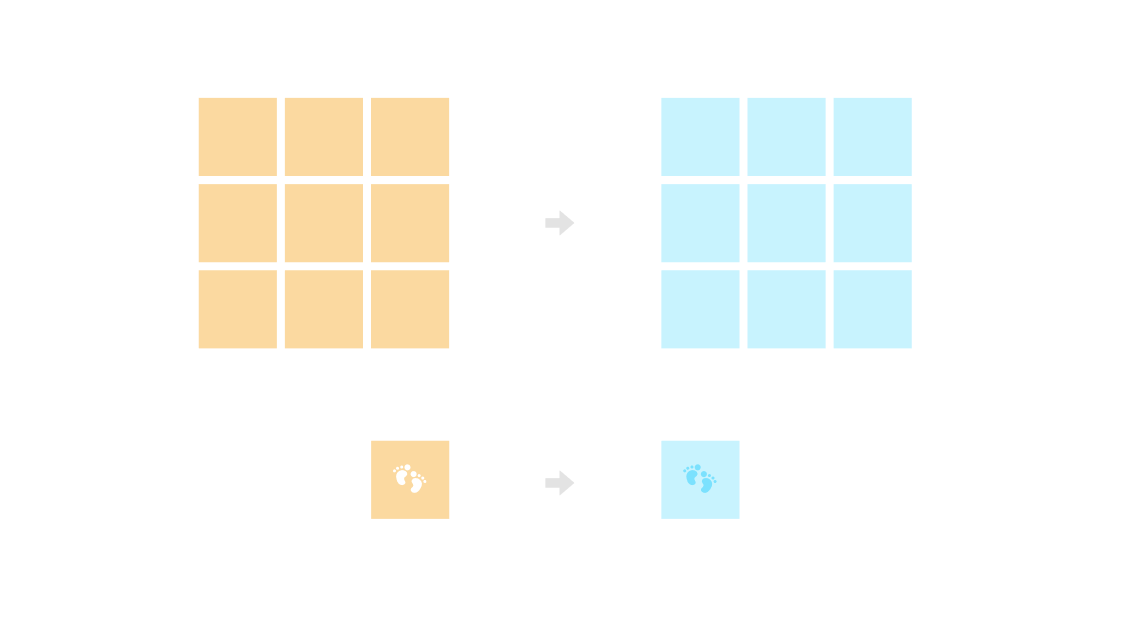
When all the grids and footprints in the space area turn blue, it means the area has been scanned completely, and you can see the number of the area on the ground;
Please note that for space areas on the boundary edge, you may not be able to move within the area to light up the footprints; in this case, you can press the [controller B button] to call up the menu and select [Skip Current Area Scan];
.png)
.png)
After scanning all areas, the system will prompt you that the space scan is complete; if there are areas outside the LBE boundary that cannot be scanned, you can call up the menu by pressing the [controller B button] and select [Skip All Area Scans] to end the scan; scanning as many areas as possible will help improve positioning accuracy;
If you have configured markers for the LBE in the venue, click [Configure Markers] to enhance spatial positioning; if no markers are configured yet, you can select [Complete] to end the process;
.png)
5. Configure Markers
Markers can help you enhance LBE positioning, making the device's tracking more accurate. If your LBE venue exceeds 100 square meters, it is recommended to configure markers to ensure the device experience;
On the page, press [Start Scanning] to configure markers;
.png)
After starting the scan, walk to the markers posted in the venue for scanning; when the device starts scanning the markers, you will see a yellow scanning frame on the marker, please scan within 1.5m of the marker;
When the marker scan is successful, you will see the scanning frame change from yellow to blue and prompt "Scan Successful";

After completing the scan of all markers in the space, press the [controller B button] to complete the scan;
At this point, you will see the prompt "Rescan the First Marker," rescan the first marker to calibrate the marker position and improve positioning accuracy.
Click [Rescan] and find the yellow scanning frame marked in the space, rescan to complete the marker configuration.
.png)
6. Map Accuracy Optimization
After completing the map scan and marker configuration, you can choose to optimize the map accuracy; the optimized map will perform more accurately in positioning, but correspondingly, map accuracy optimization will take a considerable amount of time;
.png)
You can choose to optimize the accuracy in subsequent steps (Map Modification - Map Accuracy Optimization) or complete it during map creation;
The larger the LBE boundary you define, the longer the map accuracy optimization will take; you can remove the device and wait for the optimization to complete, but ensure the device has enough power to complete the optimization; during the optimization process, you can skip the optimization at any time and wait for subsequent steps to re-optimize;
.png)
After the map optimization is complete, it will automatically proceed to the next step;
7. Calibrate Origin and Direction
You need to calibrate the origin and direction in the LBE map to help your LBE application determine coordinates;
You can look down at the ground markers and adjust the markers by moving your body and orientation; once selected, press the [controller trigger] to complete the calibration;
.png)
8. Map Creation Complete
After calibrating the origin and direction, the system will automatically generate the LBE map for you;
.png)
Wait a moment, and when the system prompts that the LBE map is successfully established, restart the device to enable the LBE map;
After restarting the device, face the markers or walls with LBE environment textures to help the device enter LBE mode better;
.png)
If you choose [Restart Later], you can later select to enable the LBE map on the application homepage and restart the device to apply the LBE map configuration.
.png)
Map Import/Export Process
1. Manual Import/Export via Computer
After creating the LBE map, you can connect the device to a PC and find the [Maps] folder in the root directory of the device, which contains a compressed file with [Deploy_Date];
Import this compressed file into the [Maps] directory of the new device. When the new device detects this configuration file, it will automatically restart and apply this LBE map.
Note
Connect to Wi-Fi before creating the map. The exported map will include Wi-Fi information, allowing the device to connect automatically.
2. Import from the Enterprise Device Manager
Batch import map details go to Enterprise Device Manager Instructions
Map Adjustment
1. Adjustment Entry
Before modifying the map, ensure you have applied the LBE map and that the [LBE Map] switch on the application homepage is turned on;
Click [Map Adjustment] to adjust the currently created/imported map;
.png)
2. Supported Adjustments
On the map adjustment page, you can modify [Accuracy Optimization], [Ground Height], and [Calibrate Origin and Direction];
If you did not perform the map accuracy optimization process during map creation, you can adjust the map on this page; you can also adjust the ground height and recalibrate the origin and direction of the LBE at any time.
.png)